Theme Layout

[Boxed]

Boxed or Wide or Framed

[boxed]

Theme Translation

Display Featured Slider

[No]

Featured Slider Styles

[Fullwidth] [caption2]

Display Grid Slider

[Yes]

Grid Slider Styles

Yes

Display Trending Posts

[No]

Display Author Bio

[no]

Display Instagram Footer

[Yes]
CL2425.com. Powered by Blogger.
Showing posts with label Hair. Show all posts
Out with the old and in with the - well, in with the old again!

Out with the old and in with the - well, in with the old again!


-|:Youtube :|: Facebook :|: Twitter :|: PrettyDNA :|: Vlog :|: FourSquare :|: Instagram :|: Bloglovin :|-


...And the sephora box comes in!

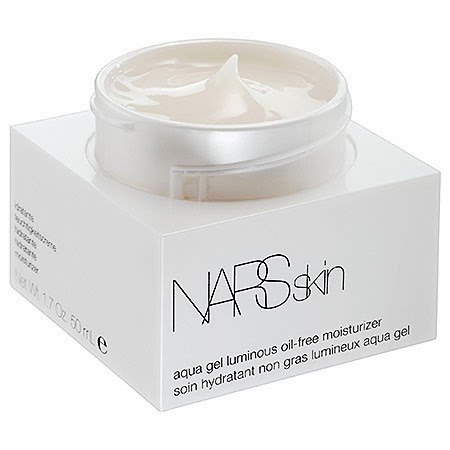
I had to do some Sephora shopping because I was running low on moisturizer.  I've already raved about the NARSskin Aqua Gel Luminous Oil-Free Moisturizer in my past video (here).  It's an incredibly light weight moisturizer that fulfills its purpose : moisturizing.  The texture is gel-like and it isn't sticky at all - which makes it a dream-like moisturizer.  It applies smoothly and absorbs quickly, leaving no residue behind.


I've used every bit of it for the past couple months and recently ran out of the bottle.  I've taken a liking of the Aqua Gel so much, I bought the Luminous Moisture cream for my boyfriend since he has dry skin.  I've had a chance to use the Luminous Moisture cream a couple of times at his place, and I liked how it was thicker yet not greasy or oily. The non-stick feature of these products just suck me in so much!


This time, I decided to get the Luminous Moisture cream, which is thicker in consistency and heavier than its Aqua Gel cousin. It's more like a paste than gel and I think it's definitely better for the dry winter days ahead.


I've very excited about this bottle, since I've been feeling my skin go dry easily under the dusty Santa Ana winds here in SoCal. :p My only hope is that it doesn't build up and break me out.  *crosses fingers*


The next purchase was my third Make Up For Ever HD foundation bottle.

Until now, I've always used #117, which is for fairly pale skin tones.  I go out of my way to avoid as much sun as possible, but living in Los Angeles has changed the circumstances.. I still try my best to duck the sun, but even just driving back and forth to work everyday makes me darker than I was in New York. I hate how my face, neck, hands and feet are pretty dark. Compared to my thighs or belly area (where there's no sun exposure whatsoever haha), I'm probably 4-5 tones darker on the exposed sites..

So this time, I had to up the tone to #120. When compared bottle to bottle, 120 barely looks different compared to 117, but when swatched, you can definitely tell that it has a more skin-like tone to it.


#117 has a bit of a white cast to it, while the #120 is more yellow-y. #120 is the next shade up from #117 that has a yellow undertone to it.  I don't usually use just one foundation and mix at least two together.  I like how #120 mixes well with my Chanel Vitalumierr Aqua 12 Beige Rose to create just the right shade that matches my current skin tone.


The rest are just goodies I got using my Beauty Insider points (I never collect them! I love using them up ASAP) and promotion code of the week.

I got a BareMinerals set using the promotion code for the samples set (I believe it's sold out now..)

 It has sample sized brush, original mineral powder foundation and Stroke of Light illuminator.  I'm really excited about this sample set, as to be honest, I've never used mineral foundation before.

There were two options - Matte or Original Light. I am in no interest of going super theatrical, so my choice was original light in a heartbeat. I like looking natural and fresh at work, so we'll see how this works! I might go cray cray over mineral foundation after the craze has calmed down 3 years ago. :p (jk)


Some other notable products are (1) REN Glycol Lactic Radiance Renewal mask (2) Living proof Hair Primer (3) Clarins Beauty Flash Balm.
 I'm equally excited about these three products (all from beauty insider points) and can't wait to review them!!

Anyway, I feel like I've somewhat settled with brands/products I like. I'm not as adventurous as I was a couple years ago.  I'm more of a repeat purchaser of couple of brands I really trust.

What about you guys? Do you guys keep purchasing the same products, or do you experiment with new brands/products within the category when needed?


-|:Youtube :|: Facebook :|: Twitter :|: PrettyDNA :|: Vlog :|: FourSquare :|: Instagram :|: Bloglovin :|-


Read more »
Catalina
5 Comments
Shea Moisture Review - I went dark brown

Shea Moisture Review - I went dark brown


-|:Youtube :|: Facebook :|: Twitter :|: PrettyDNA :|: Vlog :|: FourSquare :|: Instagram :|: Bloglovin :|-

Hi Everyone,
So I'm on this mission to give myself a makeover.  The first step is cleaning up immediate aspects of my life, such as hair, nails or the way I wear my clothes and shoes.  I've been feeling pretty low about myself lately and came to a realization that I don't really have to live with problems I can easily solve.  Out of the many things I've planned out, the very first step was cleaning up my hair.
The state of my hair was.. well.. hideous. I've dumped a ton of auburn/blonde colors on my hair a couple of times and the result was brassy bleached out frizzy hair.

I was flipping thorough InStyle April 2013 - trying to figure out the right hairstyle for me - and noticed how nice Zooey Deschanel's hair looked on her.  I always thought her hair was lush and cute so I decided to go dark brown like her!! It's a lame way to decide one's hair color, but it's a nice color anyway.

I went to target to pick up some hair dye and came across this product.

Shea Moisture 
The artwork on the box really pops and I liked the fact that it had no ammonia or sulfates in the product.  Judging by reviews and the artwork, I figured this product was targeted towards African-American women. That made it a even a better reason for me to get this product! It's the demographic that puts a lot of effort and research into hair, so it's almost guaranteed to work (no offense)!

So for the $14.99 price tag, there's a lot in the box. 

The usual gloves, developer, color cream, shampoo, conditioner, bottle + leave in conditioning oil and a  brush for professional application. 

The application bottle is huge and I had no problem covering a full head of color. The only thing was, when the color cream and developer is mixed it starts to heat up.. and that was a bit weird for me.  Also, the rinsing process reminded me of old school hair dye: the water wouldn't run clear for the longest time! I stood under the water rinsing out the product for 10 minutes and I still had some colored water coming off. 
Also, on the side note the instructions are VERY helpful.


Anyway - here's the before photos.
As you can see, my hair was an orange-aubrun color, disguised in weird blonde. 

And here's the after. 
The tips came out darker than the middle area, which is a bit obvious in natural sunlight, but in indoor settings it's not that noticeable. With the flash on, the reddish old color comes out a bit..

Overall, I love this box dye.  The massive quantity is great and the color applies very well, even on overly-processed hair like mine.  The shampoo and treatment that comes in the box is pretty nice too.  I'm not crazy about the finishing elixir, but other than that everything justifies the price. 
Of course my hair dried out a bit after the process, but I don't have the weird synthetic feeling in my hair when I'm trying to detangle my wet hair. 


Will I use it again next time? Of course!
I think this box dye is worth a try for people who are seeking drastic color change or have tough colors to cover up. 

Catalina


-|:Youtube :|: Facebook :|: Twitter :|: PrettyDNA :|: Vlog :|: FourSquare :|: Instagram :|: Bloglovin :|-

Read more »
Catalina
14 Comments

Thinning Hair


 -|:Youtube :|: Facebook :|: Twitter :|: PrettyDNA :|: Vlog :|: FourSquare :|-


Hi guys!

I'm leaving for LA in about 6 hours and I'm still not done! (^0^!!!!!)

Anyway, someone from facebook asked if I could do a tutorial on thinning hair. If I had know the secret to prevent it, I wouldn't be here writing this post but lecturing and going on tours for unlocking one of the oldest mysteries.

I do not know how to prevent thinning hair. My mom and my dad's side both have very bad hair genes (rough texture, receding hairlines, balding problems..), so I'm more of the unfortunate ones out there.

Here's something that a pastor at my dad's church told my dad to try. There is no medical backing of his method, but I've seen him since he barely had any hair left on his head. Last time I was him (when he was discussing how he gained a lot more hair than before), he actually had a noticeable amount of new hair growing out, so there may be 'some' credibility to his method.

The logic is very simple.

In his case, he thought his thinning was related more to his scalp than anything else. He would take a shower once a day or every other day like any other people.
Step in, run the water, shampoo, rinse, wash body, do whatever he needs to do in the shower, step out and be done with it.

He figured that if dead skin cells are thickly built up on the scalp then it would prevent hair growth from follicles.

So, instead of shampooing and washing off the shampoo, he got into a habit of run water on hair, lather shampoo carefully on the hair so the shampoo foam could completely soak the scalp and leave it there for 10-15 minutes.
While he's waiting on his shampoo to soak in, he would soap up his body or shave.
Apparently, this method soaked his scalp's dead skin cells, which made it easier to fall off and clear out the way for more hair to push through.

I don't know if his logic is scientifically proven, but given that there's a lot of equipments that help soak the scalp and lessen dry/dead skin cells his method seems to make a lot of logical sense.

The key to this is persistence.
You can't expect full body hair in 1 or 2 weeks. You have to be persistent and patient with your hair, there may be some results!!


Catalina


 -|:Youtube :|: Facebook :|: Twitter :|: PrettyDNA :|: Vlog :|: FourSquare :|-


Read more »
Catalina
2 Comments
Extension Pains

Extension Pains


I've never really talked about why I took out my extensions, but I think this picture will tell a long story.


hahaha, gross right?
It's actually nothing coming out from me. It's not puss nor dandruff, it is the glue that holds the strands together that had gradually melted (and a bunch of bulbs from my hair). I wanted to share some 'cons' of semi-permanent hair extensions.


First is, obviously, the excessively long time invested in the installation.

Even a trained professional could take up to 5-6 hours doing a full head. I went into it as a experimenting-trooper and had to deal with installing for almost 24 hours.

Second is the headache.

Yes, it's true that your scalp is going to scream with pain. You are literally tugging on almost every strand and adding heavy weight on your hair. Of course it's going to be a lot of pressure on your scalp. How should I put it, it feels like your ponytail getting caught in the elevator door and the elevator going up to the next floor.. ish kind of feeling?
It's not pleasant and it's no fun especially when you are trying to sleep.
Your head will feel so bruised, you won't know how to put your head down to sleep.


Third is the difficulty showering and brushing.

Every time a chunk of strand came out, I groaned "nnnooo....".
Every extension is money and my blood!!!! you can't lose it!!! and yet every time I took a shower or brushed my hair, I had a handful of extension lost!


Fourth is the main reason I decided to take out my extensions.

THE MELTING GLUE.....dun dun dunnn!!!
I don't know if it was my extensions, but the glue part started getting sticky and yuck by the end of 2 or so weeks. It would be a bit of an unpleasant moist stickiness, which freaked me out more. I would blow dry my hair with cool air for the longest time and I would even try to let my hair dry in the sun. Nothing helped!!! They just wanted to melt!!
I even changed shampoos and it didn't work out.


If you look closely, the glue separating and getting all over the place was a hot mess.
Uninstalling these extensions was pretty easy, but then what followed was the last and biggest 'con' of extensions.


.
.
.
.
.
.
.
.

Hair Loss!!!!

The amount of hair you lose when you take out the extensions is quite frightening. I thought I was going to go bald, seriously! I was so scared because every time I gently ran my fingers through my natural hair, I would have a handful of hair shedding.
I am still recovering from that stage, but the initial hair lost was quite shocking.
It's like cheesy drama scenes, when the dying girl brushes out a handful of hair and gets shocked at how her body is crumbling.. yeah, it's literally like that!
okay, not this... but you get the point, right? :p


I've listed all the dark secrets of extensions, but all in all - I kind of liked the experience. It's nice to have a lot of hair to play around with. I honestly thought the extensions were going to help me get busy with myself and have pretty curls all the time, but no, that never happened :p

Anyway,
I had promised to write about why I took my extensions out and that was the reason: melting glue.

I hope this helps as a reference for all those that are considering extensions. I can't say that ALL extensions are like mine, but I hope those that have extensions will have fun!!


Catalina


Read more »
Catalina
12 Comments
Styling Shoulder Length Hair - Messy low side-bun

Styling Shoulder Length Hair - Messy low side-bun


This was actually filmed in early December.. early December I say! :'( It just shows how slow things move on my conveyer belt. It was suppose to be a tut for pre-holidays, but I guess it could be used for New Year's Eve and any other after-parties that were meant to welcome the new year. :)

I actually love this hair style. It goes so well in so many different ways.
If you are on a vacation or on the beach and you feel like pinning a huge flower in your hair - this style goes so well for it. Also, if you want to wear a stylish fedora, this hair could also complete the look in a very edgy and chic way.

Here's a visual example!


Practically anything can be used to suit this hair style. So have fun with it! I think lighter hair colors and thin textured hair will bring out this look better.


I hope you guys enjoy the video ^-^

Catalina

Read more »
Catalina
5 Comments
Just saying hi

Just saying hi


Hey everyone!

I'm currently away from home and traveling, and I just wanted to squeeze out some time to post on my blog :p This is more of a random post.


Oh!!
I made a FACEBOOK PAGE not so long ago -
If you haven't already, check it out and meet me there too


**


The older I get, the less cluttered I'm becoming is what I have noticed about myself. I used to carry around all of my stuff (even if I ended up not using 95% of the stuff I overpacked), but I've become more and more of a minimalist during the past few years.

I have some meetings arranged for my trip so makeup is inevitable, but I've tried to keep it true to the KISS (Keep It Simple, Stupid) principle.


Tada! that's all i bought with me on my trip.

I only managed to bring the basics of basics, sticking to the rule of 'one of each category is enough'.

So far, I'm loving how light my luggages are and how I can still go about my business with enough makeup on.


Post seems a bit lame, but hey, I just wanted to say hi and post a picture that was appropriate for this blog! :p

I hope all of you are doing great!
Oh, btw, I haven't officially wrote it on the blog, but I've actually taken my extensions out awhile ago. I'll try to write a dedicated post on that issue, but that was one of the updates I wanted to talk about on this blog.

Okay, sorry about the ADHD post.
I just wanted to say hi and let you guys know that I miss talking to you all :D


Catalina

Read more »
Catalina
11 Comments
Hair Extensions - Micro Loop/link Extensions

Hair Extensions - Micro Loop/link Extensions


Hi Everyone,

I wanted to share some more details about my hair extensions I recently installed.
I used a newer (?) method, which doesn't use heat and does less damage to the hair.
Here's a video about the experience.


It doesn't require any heat, and it's removable whenever you want them out. I bought 200 strands of 100% human hair (Remy) micro link/micro loop extensions and put them in myself.


The beads at the tip of the hair are matched to the hair color, so the extensions aren't all that noticeable. You don't have to stick to one color. You can mix and match if you like highlights or hair with a lot of colors.


Here's a great video on the concept of how to install your extensions. He doesn't use the exact "microlink" method, but the method he is using is almost identical in application.


and here's a great picture tutorial, taken from milleniumwig.com.


Basically, the red colored area is the parts that you DO NOT put extensions in.


Still confused? Then here's a great video on how to install the microlinks :)


I think I went through every single Youtube video regarding microlink hair extensions before I made my purchase. I bought my hair from a Canadian website called hairannex.com. I wouldn't purchase from them again, because I feel like the hair they sent me isn't A+++ quality as they make it sound like. The hair shed A LOT, and I dunno.. after a couple of washes, the hair already seems exhausted. It's my first hair extensions, so I wasn't planning on having them in for long, but at this rate, I don't think these will last longer than a month or so.


What you need.

- Your linked hair strands.

They come in various colors, lengths and weights. My color of choice was #1 Jet Black, and I got 150 of 20" (0.5g), and 50 of 24" (0.8g).
I would definitely recommend getting the higher weights (0.7 or 0.8 opposed to 0.4 or 0.5g) because once the strands start shedding, you'll only be left with a couple of hair strands per link.

- Hair extension plier.

I'm kind of iffy about this one. I bought a plier because I thought the hair extension ones were significantly different, but they're actually not. When you lock/undo your links, you can easily do it with a regular plier (that what I did). If you like things proper, I guess investing in these won't be a big problem :p


- A ton of time, and maybe someone who could help you out.

If you're a lonely trooper like me, try to set up your mirrors so you can see how you're doing back there. It gets tricky once you finish the first layer, because hair starts getting in the way and if you don't pay attention, you can end up looping unwanted hair and it gets messy.


I've already explained it in my video, but my hair cut wasn't ready for extensions.
Here are some pictures of my extensions before I trimmed the end of my original hair.

Here's how the original installation looked like.
It was a general wtf situation.
I was so bummed and disappointed, I didn't really know what to do with my hair.
(Yes, that's how wavy my natural hair is - it's like a wild child!)


So after debating if I should take the extensions out or not, I decided to go ahead and thin out the ends. I wasn't sure how well my hair was going to blend in with the extensions, but I went ahead and trimmed off a lot of hair.


Ta-da!!!
This is how well my hair blends in with the extensions. (I look kind of fat in this picture for some reason, but oh well ._.)
In some angles you can kind of see where my real hair ends, but I think this is wayyyyyyyy better than my initial result.


Overall, I am very happy with my new long hair.
At first, the pain and weight was overwhelming and very foreign. I would wake up in the middle of the night because I was pulling my own hair by rolling over it (it's not like I never had super long hair, but it's weird. It's a different experience with extensions). Managing all the hair in the shower was a challenge too.

Oh, talking about showers, people generally complain about how slowly extensions dry, but I haven't had a problem in that department. I think it's because Texas weather is still pretty dry and hot. I walk out of the shower and let my hair air dry for about 15-20 minutes and all of the hair is completely dry. I don't have to pat it dry or blow dry it, so that's the handy part of living in Texas.


I'm not perfect nor a professional. I sometimes encounter mistakes when I go through each strand in my hair to check if they are aligned properly. The great thing about these extensions is, you can basically unlock and redo them whenever you want to. I'll just simply unlock the 'mistake' link with my pliers and readjust the position and lock it back in.

I wouldn't recommend the place I bought it from because I don't think the quality is as great as they make it sound to be. You can research and buy them off of ebay or more safely amazon (since amazon has better return services and what not).

I hope the video and post helped you guys out.


Cheers!
Catalina


Read more »
Catalina
4 Comments
Stuff thus far

Stuff thus far


Hello everyone.

I've been having a hard time dealing with my hair lately. It's beyond damage, and frizzed up like a lion's main, so I had to take a chop at it.
Getting a trim in New York was anywhere between 75 dollars - 300 dollars. So, Korea's 20,000 won (a little shy of 20 dollars) cut was a super bargain for me! :D
I went to Ja3 (JaThree?) salon in Myongdong and got a 20% DC from the original 25,000 won price. If you are in Korea, or if you have a chance to visit AND you want your hair done, you should visit them since they are having their 30th anniversary discount event. Cuts and trimming are 20% off, and other services are 30% off. Different locations offer different discounts, so try doing some research before you head off. :)

요즘들어 머리 관리가 굉장히 힘들었는데, 어느 정도였냐면 사자머리가 될 정도로 머리가 너무 상해서 관리가 안될 정도였습니다. 주말에 시간도 좀 남고 해서 머리를 좀 다듬기로 결심했습니다.
뉴욕에 있었을 때는 머리 다듬는것만 75불 (8만원 정도) 에서 300불 (30만원 이상)까지 하늘높은 줄 모르는 가격이었어요. 그래서 한국의 2만원 컷은 저에게 무지 반가운 소식이었지요 ^__^*
저는 쟈쓰리 명동점을 갔어요. 쟈쓰리는 제가 고딩때 잠깐 한국에서 학교 다녔을 때 베프랑 도곡점 다녔었는데, 알고보니 올해가 30주년이더라구요. 그래서 지금 쟈쓰리 지점들 다 20-30% 할인행사를 하고 있답니다. 머리 해야 하는 분들은 기회를 이용하세용~~


So, here's the aftermath of my venture to Myongdong


Hehe.. I like the fact that I can brush my hair without ripping out a handful of tangled hair :p
Oh, and I have this really bad(?) habit when going to beauty places (med spas, salons, aesthetic spas..etc), which is buying store products before leaving. I spent more money on these products than on my actual cut.


I bought these two products because I was shocked to hear that my hair is thinning and I have patchy spots where I am losing hair (what?!) around my crown. The blue bottle is a scalp nutrition ample that you spray on your scalp once a day after shampooing. It leaves this really tingly feeling for a while and feels like mint on your scalp.
The white bottle is soothing essence for my dehydrated hair.

The reason why my hair was so big and frizzy is because it was deprived of proper nutrition and hydration. I complained that I didn't like applying essence products because it makes my hair greasy and yuck. My hair is oily to begin with, and I didn't like the idea of soaking it with more oiliness. The stylist told me that I had to apply a water base essence rather than an oil base. So, being the easily persuaded me, I bought the aqua-based essence too. :p


As for some tips with hair care, I think taking care of the scalp is extremely important for healthy hair. Of course hydrating the ends to prevent dryness is important too, but providing good nutrition and allowing proper circulation is essential for healthy roots and strong hair. Also, dry and flaky scalp prevents regular hair growth because it clogs up the openings, reducing the amount of hair growth.
Just invest a couple of minutes per day and try to massage your scalp with the tip of your fingers to stimulate circulation. Also, if you're in front of a desk or crouched in front of the computer all day long, try relaxing your neck and shoulders to provide a good flow of blood to your head. I've been really bad with my posture and not caring about circulation, but the alarming news of losing hair *sob* made me feel a bit more alert about how every little habit effects my appearance.


If you are reading this post, stop what you are doing, straighten up your back and try to loosen the muscles around your neck and shoulders to release the tension. Massage your scalp from the middle of your head around the crown, all the way down to the temples by applying some pressure with the tip of your fingers. :)


This is quite belated, but I guess I'll post it since I'm feeling a bit homesick at the moment.

Some of you might know, some might not, but I'm in Korea until the 17th. The reason is vacation + business I guess? I've left New York, and instead of heading straight to LA, I'm staying in Texas for a short period of time to work on a project I've wanted to do for a while. That project is one of the main reasons I've left New York, so I guess you guys can stay tuned since it is launching in late August or early September.

Leaving New York was a bit surreal, and I wanted to dedicate a post to it, but I somehow lost the right timing for it. I've lived in New York for 6 years, and the time there was great. There's this magic to the city and I feel very lucky to have actually lived, graduated school and worked in New York.


This was my first taste of New York. It was the very first picture I took when I was at JFK in 2005. I was very impressed with the clear sky, and amazed at the view of the city when I first went into Manhattan. I was very optimistic about my future in New York, and looking back, I think I have accomplished almost everything I could in New York.

I spent my roaring 20's in the bustling city, I went to a great school, I met some of the smartest people on the face of earth, I took many classes taught by Nobel laureates, I met great people in general, I had a great job, I lived in one of the most famous places on earth, I went to so many great world-class restaurants, I've set foot into one of the toughest industries to get into, I went to awesome museums whenever I wanted to, I jogged in central park in the mornings, I've had my share of sticking my foot in a closing subway door to force it open, I had a good piece of the delivery food scene, and the best part is, I met the love of my life in New York.

Here are some of my souvenirs from New York.


me, having fun at school


me at the Rockefeller skating rink on x-mas eve :p


resting @ central park...with my precious whole foods bag


rainbow room


Lincoln center after an opera


at boyfriend's graduation


at MoMA, cafe 2 has really good stuff to eat


sleepless nights, consumed with writing essays, were rewarded with beautiful sunrises


peaceful scene at central park north


a view from my apartment building in midtown (3:00 AM)


..and my last glimpse of the city while heading to JFK


I regret not taking a lot of pictures during my stay there. If you are planning to move to New York, or if you are already living there, all I want to say is "enjoy!" I think New York is a special experience and I hope everyone who has a chance will cherish their stay in the magical city.


Hehe, thanks for reading this long post.
I have bought some goodies for a blog giveaway today, so stay tuned for that too!
I will post the giveaway once I get back to the states.

Cheers!

Catalina
Read more »
Catalina
17 Comments
TREND: Romantic Bangs (fringes)

TREND: Romantic Bangs (fringes)


oh oh Hi All :)

Today I wanted to talk about bangs. I've always been a bang person, I don't think I've had a period in my life (well.. after 15 I mean), where I was bangless. I guess it's like my security blanket since I don't have the prettiest forehead and I like to hide it.. -.-

But today I just wanted to talk about bangs. As hair styles come and go, so do trends for bangs. For example, excessive layered hair is so early-2000's, so are straight ironed, vertically-zig-zag-cut sparse bangs. The gossip girl bangs were so 2009, and the heavy straight bangs are one of the things that a lot of people should let go in 2011. Then WHAT IS the trend?
Romantic bangs!! :)
I made a tutorial on it today


(I'm wearing Neo Cosmo Glamour lens in Green in this video)


You know how a lot of people are stubborn about their bangs and like to keep then straight no matter what their hair style is? I think that habit should be tossed.
Check out what's going on in the bang (fringes) world.

- Moderate Curls -

Kumiki of popteen

Jessica (middle) of SNSD

Catherine Zeta Jones

Kumiki again

Kumiki again

another Kumiki


- A mixture between spiky straightness and curliness -

IU (Korean singer/idol)

Hilary Duff


Tiffany (SNSD - Hoot music video)


- Tighter curls & variations -


Jessica Alba

Kim Tae Hee (Korean Actress)

Angelina Jolie (zomg!!!! love it on her!)

Rachel Mcadams

Sunny (SNSD)


Taeyeon (SNSD)

Sunny again (hoot M/V)

Japanese hair model

Kumiki

Nana (afterschool)


Sooyoung (SNSD)

The only thing you have to be careful is your tools. If you use too thin of a curler this is what will happen.

(...)

or this LOL (it's me) - curling failed with a flat iron
I'm wearing Neo Clasmo Glamouru Lens Brown in this picture

So all you need is overgrown bangs and your curling tools. If you want the curls to be subtle, try curling soft curls (very loosely) towards the end. If you want bigger curls (like Angelina Jolie) use a bigger curler/brush. At first it might get frustrating since the styling part is the hardest, but once you get used to it, it will be an easy breezy way of taking care of your awkward bangs :)

Let me know how the curling goes :D

Catalina
Read more »
Catalina
27 Comments

Follow @CL2425

    limit: 6, sortBy: 'random', template: '
  • ', resolution: 'standard_resolution' }); feed.run();